

Sunday, December 30, 2012
TAWS 13 Day Giveaway!
The Alley Way Stamps is having a super giveaway to celebrate their birthday!!!!!!!!!
Sneak peek - LUFP
I have a little sneak peek of a card I made for Link Up For Pink!
I hope you'll stop by the blog and check it out.
Ladies - Don't forget your mammograms!!! Take care of your girls!

I hope you'll stop by the blog and check it out.
Ladies - Don't forget your mammograms!!! Take care of your girls!

Thursday, December 27, 2012
Challenge #8 - LUFP
I hope all of you had a joyous Christmas with family and friends!!!! I had a wonderful day with my family. We enjoyed a delicious meal at my daughters house and then played a basketball shootoff tournament with the Kinect. My 2 daughters and I had the 3 highest scores, so much for the guys, we are women hear us roar!!!!!!!!!
We have a new challenge for you over at Link Up For Pink, Dash of Pink!

Our generous sponsor for this challenge is Sassy Studio Designs. They have lots of fun digital images to choose from so I hope you'll visit their store and show them some support. I used Madam Honey (Fortune Teller) for my card.

Supplies used: card stock - brown, pink, white; patterned papers - Mi Amore from Jolie Chocolat by SEI and scraps from my stash; digital image - Sassy Studio Designs; Copic markers; border punch - Fiskars; ribbon from Oasis by SEI; rhinestones - BoBunny and Kaiser Craft; Silhouette Studio cut file; fonts Carmencita and Carmine; yellow Stickles; brad with jewel - my stash; Pop Dots.
We have a new challenge for you over at Link Up For Pink, Dash of Pink!
Our generous sponsor for this challenge is Sassy Studio Designs. They have lots of fun digital images to choose from so I hope you'll visit their store and show them some support. I used Madam Honey (Fortune Teller) for my card.

Supplies used: card stock - brown, pink, white; patterned papers - Mi Amore from Jolie Chocolat by SEI and scraps from my stash; digital image - Sassy Studio Designs; Copic markers; border punch - Fiskars; ribbon from Oasis by SEI; rhinestones - BoBunny and Kaiser Craft; Silhouette Studio cut file; fonts Carmencita and Carmine; yellow Stickles; brad with jewel - my stash; Pop Dots.
Monday, December 24, 2012
Nativity Cube
Merry Christmas!!!!!
I wanted to share a Nativity Cube I made. I saw it about a week ago on Jen Del Muro's blog I ♥ 2 Stamp and fell absolutely in love with it!!!!
I started out with a piece of 4X4 that my husband cut for me. I sanded it and painted it with off white acrylic paint. After the paint dried I sanded the edges to give it a worn look. I took five 1" doll head/knobs and painted them with black acrylic paint. I glued 4 on the bottom for the feet and one on the top. I then gave the whole thing a coat of Mod Podge and let it dry.
While the Mod Podge was drying I picked out my cuts from the Silhouette Studio store. I sized each cut file so that it would fit on to my cube and then cut them out of black vinyl and attached them to each side of the cube. I then went over the whole thing with another coat of Mod Podge. When that coat dried I added some rhinestones to the stars and the knob on the top. I tied a sheer bow around the knob, cut the pine branches out with a Silhouette cut file and glued those on top. Threaded a jingle bell with twine and glued that on for the final touch.


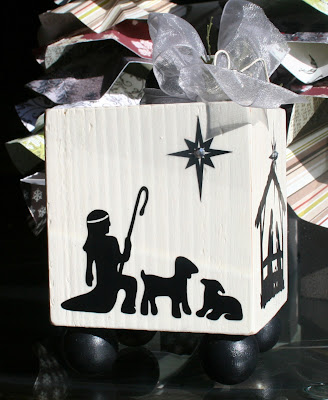

Supplies used: wood 4X4 block - Home Depot; 1" wood doll head/knobs, off white and black acrylic paint, Mod Podge, jingle bell, ribbon - Michaels; black vinyl - Hobby Lobby; rhinestones - Hero Arts; twine - my stash; green card stock; Silhouette Studio cut files.
Thank you Jen for such a fun and beautiful project!!!!!!!
I wanted to share a Nativity Cube I made. I saw it about a week ago on Jen Del Muro's blog I ♥ 2 Stamp and fell absolutely in love with it!!!!
I started out with a piece of 4X4 that my husband cut for me. I sanded it and painted it with off white acrylic paint. After the paint dried I sanded the edges to give it a worn look. I took five 1" doll head/knobs and painted them with black acrylic paint. I glued 4 on the bottom for the feet and one on the top. I then gave the whole thing a coat of Mod Podge and let it dry.
While the Mod Podge was drying I picked out my cuts from the Silhouette Studio store. I sized each cut file so that it would fit on to my cube and then cut them out of black vinyl and attached them to each side of the cube. I then went over the whole thing with another coat of Mod Podge. When that coat dried I added some rhinestones to the stars and the knob on the top. I tied a sheer bow around the knob, cut the pine branches out with a Silhouette cut file and glued those on top. Threaded a jingle bell with twine and glued that on for the final touch.


Supplies used: wood 4X4 block - Home Depot; 1" wood doll head/knobs, off white and black acrylic paint, Mod Podge, jingle bell, ribbon - Michaels; black vinyl - Hobby Lobby; rhinestones - Hero Arts; twine - my stash; green card stock; Silhouette Studio cut files.
Thank you Jen for such a fun and beautiful project!!!!!!!
Friday, December 21, 2012
Sneak Peek - Pins To Creations
Happy Friday everyone!!!!
Hope your weekend includes some crafty time and I'd like to wish all of you a very Merry Christmas!!!!
I have a new post over at Pins To Creations and I hope you'll hop on over to check it out!!!

Hope your weekend includes some crafty time and I'd like to wish all of you a very Merry Christmas!!!!
I have a new post over at Pins To Creations and I hope you'll hop on over to check it out!!!

Tuesday, December 18, 2012
Merry Christmas To All / CTO #93
Tuesday has rolled around again which means its time for a new challenge over at Celebrate The Occasion!
For this week the challenge is Christmas, anything goes!!!
We are also having a design team call, if you'd like to be a design team member with us please hop over to the blog to check out all the details. The term runs from January to June. You have until Dec. 22nd to apply.
For my card this week I used a digital image from Floppy Latte Designs, pattern paper from My Minds Eye and a cut file from Silhouette Studio.


Supplies used: card stock - cream, 2 shades of red; pattern paper from Lost and Found by My Minds Eye; digital image - Floppy Latte Designs; trim and ribbon - Michaels; pearls Kaiser Craft; Silhouette Studio cut file; Pop Dots.
Monday, December 17, 2012
Sleigh Bells Ring.....
Wow, one week until Christmas!!!!
Time just flies by and I feel like I still have so much to do, especially baking :)
Yesterday my hubby and I made fudge and Mounds balls, MMMMM!!!!
I'd like to share a little Cas card I made for Case This Sketch.

For my card I simply cut some bells out with a Silhouette Studio cut file and hung them with some tinsel trim. The sentiment was done on my computer.


Supplies used: card stock - white, 2 shades of red, 2 shades of green; Silhouette Studio cut file; tinsel trim - my stash; font - Santa's Sleigh and SNF Lavender.
Sneak Peek - LUFP
I have a little sneak peek of a card I made for Link Up For Pink!
I hope you'll stop by the blog and check it out.
Ladies - Don't forget your mammograms!!! Take care of your girls!

I hope you'll stop by the blog and check it out.
Ladies - Don't forget your mammograms!!! Take care of your girls!

Sunday, December 16, 2012
Joy Presents Card
I'm popping in today to share a card I made for this weeks challenge at CASology!

For my card I used a cut file from Silhouette Studio. When I opened the file on my mat I resized the image and duplicated it twice so that I could line up three images and then cut them out of my patterned paper.
I took the negative image and attached it and the pieces that make the presents to another piece of patterned paper with Pop Dots. I tied a piece of twine around the bottom and attached it to my card base with Pop Dots also.
Then I glued one of the cut presents to the card base above my patterned paper and stamped my sentiment.


Supplies used: card stock - cream; patterned papers by We R Memory Keepers; cut file - Silhouette Studio; twine - Liz's Paper Loft Boutique; sentiment stamp - Stampin' Up; ink - Tuxedo Black by Memento; Pop Dots.
Saturday, December 15, 2012
I Love Snow Blog Hop
Hello everyone and welcome to the I Love Snow Blog Hop!


We have all kinds of wonderful snow related projects to show you!
If you've arrived here from Dawn's blog Dawns Designs That Delight then you are in the right place. If you just visited my blog, you will want to start at the beginning at Lisa's blog HoneyBearz Designs so you don't miss any of the fabulous projects.
For my project I wanted to use a really cool new stamp set from Inky Antics called Decorating Snowman.
What is so cool about this stamp set is it is made to go with their Honeycomb Paper Pads like Peppermint Stripe which I used on the inside of my card. It makes such a fun 3D embellishment in your card and a little surprise when the receiver opens it.


Supplies used: card stock - white, red, green; patterned papers by Daisy D's; stamps - Decorating Snowman by Inky Antics; ink - Tuxedo Black by Momento; Copic markers; Stickles in Icicle; Yellow and Xmas Red; pearls - Kaiser Craft; Honeycomb Paper Pad in Peppermint Stripe by Inky Antics; Silhouette Studio cut file for snowflake; brad and ribbon - my stash; Pop Dots.
Here is a little blog candy you can have the chance to win if you are a follower of my blog and comment on this post!!!!

Now your off to see what Shawn at Crafty Chics has created.
Thanks for stopping by!!
Thursday, December 13, 2012
Blog Hop Winners!
I have a couple of blog hop winners to announce.
Thank you to all who hopped along at the Pins to Creations Winter Blog Hop and the Christmas Home Decor Blog Hop!!!!
I used random.org to pick the winners.
For the Pins To Creations Winter Blog Hop random.org picked #17:
marg0006 said...
What a cute and creative idea for a tree. Great job.
marg006 at verizon dot net
And for the Christmas Home Decor blog hop random.org picked #11:
Creative M said...
WOW!very Beautiful & Creative!
Have a wonderful Sunday,
Migdalia
Congrats ladies!!!! If you will email me your addresses I will get your goodies mailed out to you!
Wednesday, December 12, 2012
Rudolph Tags
I'm back again with more tags!
I hope I'm not boring you with all of these, but I had so much fun creating them and also enjoyed stepping away from card making for a bit.
Rudolph is my Christmas Favorite, I guess it's all those childhood memories that movie conjures up!!!!
So.... I had to make some tags with him as the focal point.
I used a stamp from Crayon Christmas by Stampin' Up (I'm getting great use of this set Cathy!!!!) and popped a red pearl on for his nose. For the snow I free cut some vellum and added Icicle Stickles to it.


Supplies used: card stock - brown; patterned paper from Blitzen by Basic Grey; Vellum; tag template - Colluzzle; Icicle Stickles; snowflake eyelet - Eye-Lets Etc.; Crop-A-Dile; pearl - Kaiser Craft; twine - Trendy Twine; rudolph stamp - Crayon Christmas, sentiment - Holiday Sampler both by Stampin' Up; ink - Tuxedo Black by Memento; Pop Dots.
Tuesday, December 11, 2012
Christmas Tags
Happy Tuesday all!!!!
I'm back today with some more tags.
There are so many wonderful cut files at Silhouette Studio that I'm like a kid in a candy store when I go there. For todays tags I decided to take some of their darling files and make them the focus of my tags.
Just a little pretty paper from Authentique and a few pearls and I have some more lovely tags.


Supplies used: tags - Staples; card stock green, 2 shades of red; patterned paper - Surprise from Wonder Collection by Authentique; border punches - Fiskars and Martha Stewart; brad - American crafts; pearls - Kaiser Craft; Silhouette Studio cut files.
Monday, December 10, 2012
Birch and Cardinal Christmas Card
What a beautiful weekend we had here in my neck of the woods!
Last weekend it was blowing so hard my husband couldn't put our outside Christmas lights up, but we got it done Saturday and the house looks so pretty!
I have a card to share that I made for this weeks challenge at Case This Sketch.

and the challenge at Creative Inspirations Paint which is Inspired By: CAS
I saw this pretty cut file at Silhouette Studio. I thought it would be perfect for this sketch. Oh.... and did I mention that I love cardinals!

Supplies used: card stock - white, grey, red; rub on - American Crafts; Pop Dots.
Sunday, December 9, 2012
Pins To Creations Winter Blog Hop
Hi!!
Merry Christmas, Happy Hanukkah and Warm Winter Wishes!!!! Welcome to the Pins To Creations Winter Blog Hop. We are hoping to inspire you with some fun winter and holiday creations which we've pinned on our boards at Pinterest and now we've put our twist on for you.

If you've arrived at my blog from Jamie's blog Scrap Queen then you are in the right place. If not, please start off at the Pins To Creations blog so you don't miss any of the fabulous creations we have to show you!!
For my project I decided to make my version of these cute trees I pinned awhile back from Simple Home. Life.

Aren't they adorable?
I started with 3 wood blocks that were 2" X 2" and drilled a small hole in the tops the same size as the wooden dowels I had purchased. I painted them first with Martha Stewarts multi suface High Gloss acrylic craft paint in Gray Wolf and after the paint dried I put on a coat of Martha Stewart multi-surface Glitter acrylic craft paint in Antique Silver.
The wooden dowels I purchased were 3/16" X 12". I left one that size, cut another to 10 1/2" and the third to 9". Then glued them into the holes in the wood blocks.
I used patterned papers in Alpine Frost by SEI for my trees. For the large tree I cut 13 circles in 1/2" intervals from 1 1/2" up to 8", for the middle tree I cut 12 circles from 1 1/2" up to 7 1/2" and for the small tree I cut 11 circles from 1" to 6". I folded them according to the tutorial on the Simple Home. Life blog. snipped the tops so I could slide them onto the dowels and hot glued them in place.
For the finishing touch I hot glued glitter stars by Jolee's to the tops of the trees.


I will have some Christmas Blog candy you will have a chance to win if you are a follower of my blog and leave a comment on this post!
Thanks for stopping by and now you're off to see what Ashley's created at The Glamorous Side Of Scrapping!
Saturday, December 8, 2012
Pink Tags For LUFP
For Saturday's lyrics how about a little Chicago:
Saturday in the park
I think it was the Fourth of July
Saturday in the park
I think it was the Fourth of July
People talking, people laughing
A man selling ice cream
Singing Italian songs
Can you dig it (yes, I can)
And I've been waiting such a long time
For Saturday
For today I'd like to share some "pink" Christmas tags I created for Link Up For Pink.
I chose to use the same patterned paper, but come up with three totally different tags.


For the large snowflake tag, I traced the tag on the patterned paper, cut it out and then cut it at an angle. After attaching it to the tag I zig zag stitched with my sewing machine. Then just glued my large, glittery snowflake towards the bottom.

For the next tag I again traced the tag on to the patterned paper and cut it to fit the top portion of the tag. I chose some card stock to match the dark pink in the pattern paper, cut a small strip of it, border punched it, attached it under the patterned paper then stitched across the top with my sewing machine and embellished it with a few pearls. I stitched around the bottom of the tag, punched a heart in one corner and attached a snowflake sticker in the other.

For the last tag I put the bottom of my tag, centered in my border punch, and just punched one time so that it would stay intact. Then I took a small piece of the patterned paper and border punched it, glued it above the punched out portion of the tag and zig zag stitched across it. I used Stickles to put some random snow flakes on the tag. I cut a tree out with the reverse side of the patterned paper, attached it to the tag with Pop Dots and topped it with a snowflake sticker.

Supplies used: tags - Staples; patterned paper - Silly Chilly in Jolly By Golly by Cosmo Cricket; large snowflake - Scrapbook Studios; card stock - dark pink; pearls - Kaiser craft; border punch - EK Success; small heart punch - my stash; snowflake sticker - Sandylion Essentials; Diamond Stickles; border punch - Fiskars; small snowflake sticker - Sandylion Essentials; Pop Dots; sewing machine.
Subscribe to:
Posts (Atom)